
The Stages of Growing Weed
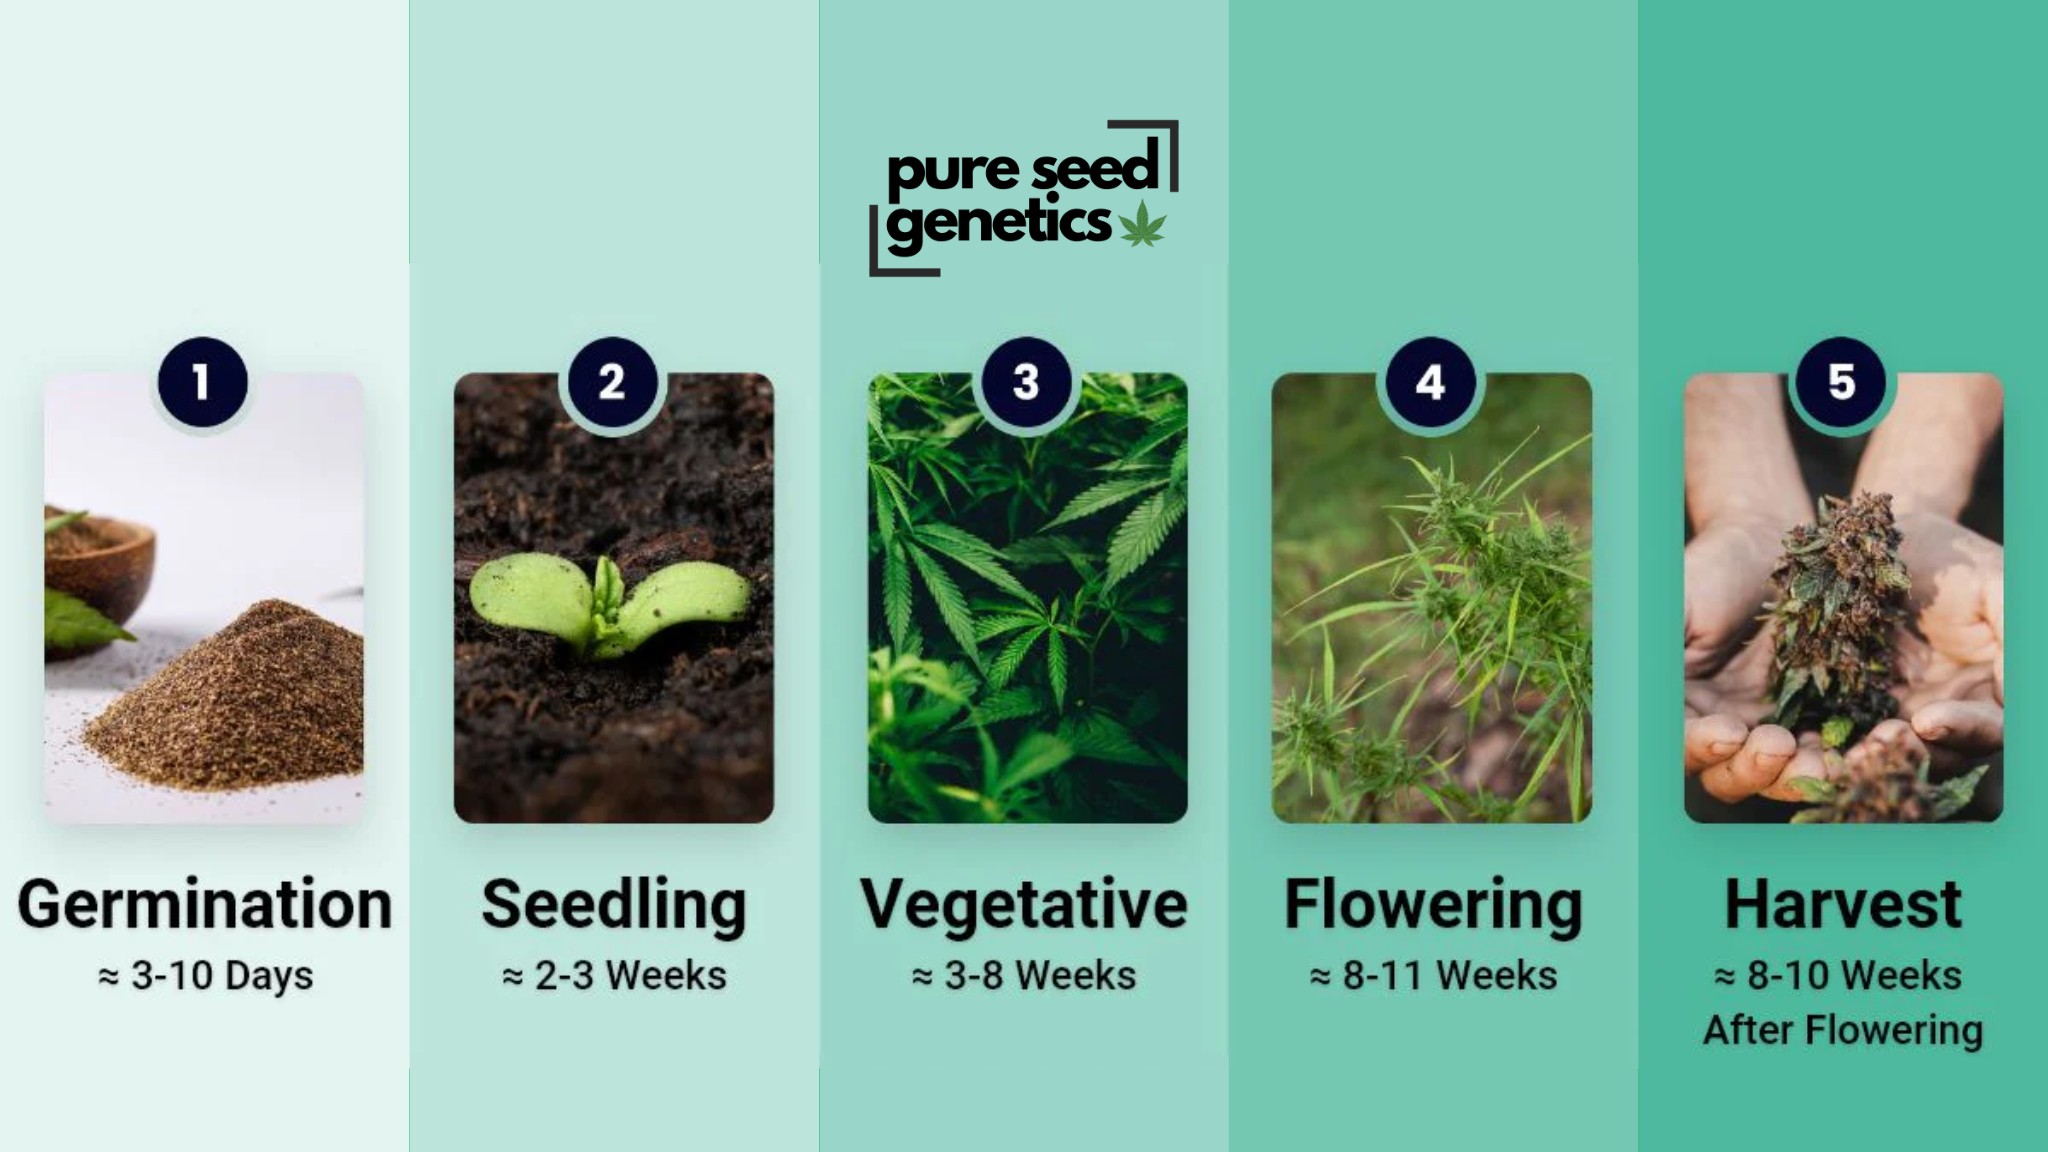
Table of Contents
Growing Weed It’s not just about planting a seed and waiting for it to grow; successful cultivation involves understanding the plant’s needs, environment, and how it evolves through different stages. Whether you’re a beginner or an experienced grower, each stage of the weed growth cycle requires specific care, attention, and expertise. By mastering each phase, you can ensure your plants reach their full potential, producing high-quality buds with the desired potency, flavor, and aroma.
Weed cultivation is a complex process that involves several stages to ensure the plant’s health and maximize its yield and potency. Each stage requires specific care and attention, as different factors like light, water, nutrients, and environmental conditions affect the plant’s growth. Here’s an introduction to the Stages of Growing Weed, which are essential for producing high-quality cannabis:
Growing Weed – Germination Stage (1–7 Days)
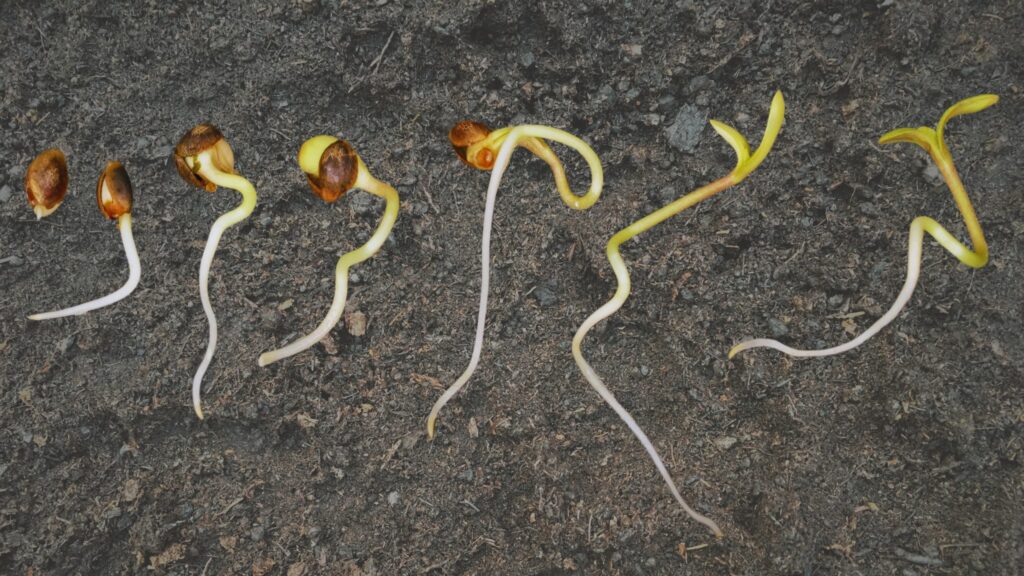
The Germination Stage is the first and most critical phase in the cannabis plant’s life cycle, lasting anywhere from 1 to 7 days. It’s the stage where a seed transitions from dormancy into an active growing plant. This process begins when the cannabis seed absorbs water, a process called imbibition. The seed’s outer shell softens and swells as it absorbs moisture, which activates the plant’s internal systems. The enzymes inside the seed begin breaking down stored nutrients, like starches, to provide energy for growth. This step is crucial because it kick-starts the metabolic activities that are required for germination. Without sufficient moisture, the seed cannot begin this process and will remain dormant.
Once enough water has been absorbed, the seed coat cracks open, revealing the inner part of the seed. The first structure to emerge is the taproot, a thick, central root that grows downward into the growing medium. The taproot’s role is to anchor the seed into the soil and begin searching for water and nutrients. This downward growth is vital because it establishes the foundation for the plant’s root system. As the taproot grows, it will branch out into smaller lateral roots, providing a network that will support the plant as it matures.
Simultaneously, the shoot (or stem) begins to push upward from the seed. This upward growth is the beginning of the plant’s visible structure. The first leaves to appear are the cotyledons, which are the seed leaves. These cotyledons are not typical cannabis leaves; rather, they are part of the seedling’s initial setup, providing energy through photosynthesis. As the cotyledons unfold and expand, they start converting sunlight into energy, giving the seedling the necessary fuel for continued growth. Though not the plant’s final leaves, they are essential in helping the seedling survive during these early days.
As the seedling continues to grow, the true cannabis leaves, which have the characteristic serrated edges, start to form. These true leaves will soon begin to take over the role of photosynthesis, providing the plant with the energy it needs to move into the vegetative stage. During germination, the plant is still quite fragile, and careful attention to its environment is essential. The seed needs consistent moisture, but not too much water, as it can drown the seed or lead to mold. The temperature should be kept between 70°F and 85°F (21°C to 29°C), as it’s the optimal range for activating the seed’s metabolic processes. Additionally, the environment should have good air circulation to avoid mold or fungal infections that can harm the developing seedling.
Once the taproot has successfully anchored the seedling and the shoot has pushed above the soil surface, the seedling will begin its journey into the next stage of growth. If the germination process is successful, the plant will be healthy, with a strong foundation for future growth. If anything goes wrong in this early stage, such as improper moisture levels, temperature fluctuations, or poor seed quality, it could affect the entire plant’s development, leading to a poor harvest or no growth at all.
The Germination Stage is when the cannabis seed absorbs water, cracks open, and begins to sprout, marking the beginning of the plant’s life cycle. The taproot emerges first, followed by the shoot and cotyledons. This stage is essential because it sets the foundation for the rest of the plant’s growth. With the right environmental conditions, including moisture, temperature, and air circulation, the seed will successfully germinate and grow into a strong seedling that can transition into the vegetative stage. This is the crucial first step in cultivating a healthy cannabis plant that will eventually produce high-quality buds.
Pure Seed Genetics – Cannabis Seeds
-
Northern Lights
Price range: $39.00 through $180.00 -
Blue Haze
Price range: $39.00 through $180.00 -
CBD Blueberry
Price range: $39.00 through $180.00 -
Zkittlez Feminized
Price range: $39.00 through $180.00
Seedling Stage (2–3 Weeks)
The seedling stage is one of the most delicate and crucial phases of cannabis cultivation, lasting approximately 2 to 3 weeks. At this point, the plant is still in its infancy, developing its first set of true leaves and building the foundation for healthy growth. The seedling emerges from the germinated seed and requires a stable environment with optimal conditions to thrive.
Light is one of the most important factors during this stage. Cannabis seedlings require 18 to 24 hours of light daily, preferably from a full-spectrum LED or CFL grow light to prevent stretching and weak stems. Too much or too little light can lead to stunted growth or legginess, which weakens the plant’s structure. Temperature and humidity also play vital roles; seedlings thrive in temperatures between 68–77°F (20–25°C) and relative humidity of around 65–70%. High humidity helps young plants retain moisture since their root systems are still underdeveloped.
Watering must be done with extreme care. Overwatering is a common mistake that can lead to damping off, a fungal disease that causes seedlings to wilt and die. The soil should be light, well-aerated, and slightly moist but never soaking wet. Using a spray bottle or lightly watering around the base of the seedling helps avoid root rot. pH levels should be maintained between 6.0 and 6.5 to ensure proper nutrient absorption.
During this stage, the plant primarily focuses on root development and establishing its first few leaves. The initial cotyledon leaves provide the seedling with enough nutrients to start growing, but once the first set of serrated leaves appear, it becomes essential to introduce mild nutrients. However, fertilizers should be used cautiously, as seedlings are highly sensitive to nutrient burn. A light nitrogen-rich feeding can support early growth but should be kept at a quarter of the regular strength to prevent damage.
Strong air circulation is also necessary to strengthen the stem and prevent mold growth. A gentle fan can help simulate natural wind conditions, encouraging the seedling to develop a sturdy base.
By the end of the seedling stage, the plant should have multiple sets of vibrant green leaves and a well-established root system, preparing it for the next phase: the vegetative stage, where rapid growth and structural development begin.
Vegetative Stage (3–8 Weeks)
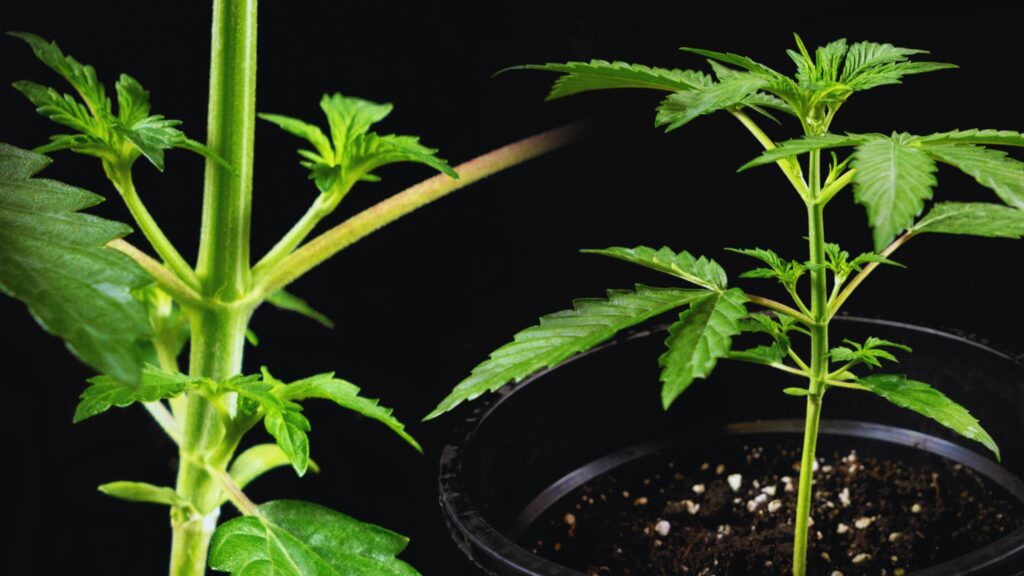
The vegetative stage is a critical period in the cannabis growth cycle, lasting anywhere from 3 to 8 weeks, depending on the strain and desired plant size. During this stage, the plant experiences rapid growth, developing a strong root system, thick stems, and lush foliage. It shifts its energy toward building a sturdy structure to support future buds, focusing on leaf and branch production rather than flowering.
Light plays a crucial role in this stage, with cannabis requiring at least 18 hours of light per day, although some growers opt for a 24-hour light cycle to maximize growth. A strong full-spectrum LED or HID grow light ensures the plant receives adequate energy for photosynthesis, leading to vigorous growth. Natural outdoor growers benefit from the long daylight hours of summer, which promote the plant’s expansion.
Proper nutrition becomes essential as the plant’s demand for nutrients increases. During this stage, cannabis requires higher levels of nitrogen, as it is a key component for leafy growth. Growers typically use a vegetative-stage fertilizer rich in nitrogen, phosphorus, and potassium (N-P-K ratio around 3-1-2). Overfeeding should be avoided, as excess nutrients can lead to deficiencies or nutrient lockout, affecting overall health. Watering should be done regularly but carefully, ensuring that the soil remains moist but never waterlogged to prevent root rot.
Temperature and humidity must be closely monitored to keep the plant thriving. Ideal temperatures range between 70–85°F (21–29°C), while humidity levels should gradually be reduced to around 50–70% to encourage strong root development. Adequate airflow from fans or ventilation systems helps strengthen stems and prevents mold or pest infestations.
Training techniques such as topping, low-stress training (LST), and pruning are commonly used during the vegetative stage to shape the plant and encourage more bud sites. Topping involves cutting the main stem’s tip to promote the growth of multiple colas, while LST gently bends branches to create an even canopy, maximizing light exposure. Pruning lower leaves and unnecessary growth improves airflow and directs energy toward productive parts of the plant.
By the end of the vegetative stage, the cannabis plant should have developed a strong and bushy structure, with numerous branches and a healthy green appearance. It is now ready to transition into the flowering stage, where light cycles will change, and the plant will begin producing buds. This shift marks a crucial turning point, as growers must adjust their care techniques to support optimal flowering and resin production.
Pre-Flowering Stage (1–2 Weeks)
The pre-flowering stage is a short yet essential transition phase in the cannabis growth cycle, lasting approximately 1 to 2 weeks. This stage signals that the plant is preparing to bloom, shifting its focus from vegetative growth to flower production. During this time, the first signs of sex determination appear, allowing growers to identify and separate male and female plants. Female plants begin to develop white pistils, tiny hair-like structures that will eventually turn into buds, while male plants produce small pollen sacs. If growing regular seeds, it is crucial to remove males unless breeding is the goal, as they can pollinate females, leading to seed production rather than high-quality buds.
A significant change during this stage is the adjustment of the light cycle for indoor growers. Cannabis plants require 12 hours of darkness and 12 hours of light to trigger full flowering. This 12/12 light schedule mimics the natural shortening of daylight hours in late summer, signaling the plant to transition into its reproductive phase. Outdoor growers will notice pre-flowering as the seasons change and daylight hours decrease naturally.
The plant undergoes a noticeable growth spurt, often referred to as the “stretch” phase, where it can double or even triple in size. This rapid expansion means that branches and stems grow longer, preparing to support the heavy buds that will soon develop. To manage this stretch, growers may continue low-stress training (LST) or trellising to maintain an even canopy, ensuring light distribution remains optimal.
Nutrient needs begin to shift as the plant starts using more phosphorus and potassium for bud development while requiring less nitrogen than in the vegetative stage. Many growers switch to a bloom fertilizer with a lower nitrogen and higher phosphorus-potassium (P-K) ratio to encourage robust flowering. However, abrupt changes in feeding should be avoided, as a gradual transition prevents nutrient shock.
Watering practices may also need adjustment, as plants may consume more water due to increased growth. At the same time, humidity levels should be gradually lowered to prevent mold and mildew formation, as developing buds are susceptible to excess moisture.
By the end of the pre-flowering stage, the plant will have clearly defined flowering sites, with visible white pistils emerging from multiple nodes. At this point, it is fully committed to flowering, and growers must ensure optimal conditions for bud development. The next phase, full flowering, is when the plant starts producing trichome-rich buds, leading to the most anticipated part of the cultivation process.
Flowering Stage (6–12 Weeks)
The flowering stage is the most anticipated phase of cannabis cultivation, lasting between 6 to 12 weeks, depending on the strain. This is when the plant shifts all its energy toward producing dense, resin-coated buds. During this stage, growers must adjust their care routines to optimize bud development and maximize potency. The 12/12 light cycle must be maintained consistently to keep the plant in its flowering phase, as any interruption in darkness can stress the plant and potentially cause hermaphroditism, leading to unwanted seed production.
In the early weeks of flowering, the plant continues stretching as it finalizes its structural growth. White pistils become more prominent, marking the spots where buds will form. The demand for phosphorus and potassium increases, while nitrogen intake should be reduced. Many growers switch to a bloom-specific fertilizer with a high phosphorus and potassium ratio to support bud formation and resin production. Proper nutrient balance is essential to avoid deficiencies, which can lead to stunted growth, yellowing leaves, or reduced yields.
As the mid-flowering phase approaches, bud sites expand, and trichomes—the tiny, crystal-like glands responsible for producing cannabinoids and terpenes—begin to cover the flowers. This is when the plant starts to release its characteristic aroma, and maintaining proper airflow becomes crucial to prevent mold, especially in humid environments. Humidity should be reduced to 40–50% to protect the dense buds from developing bud rot. Watering should be done carefully, ensuring that the roots receive adequate moisture without waterlogging the soil.
In the late flowering stage, buds swell, trichomes mature, and the plant approaches its peak potency. Growers closely monitor trichome color using a magnifying glass or jeweler’s loupe to determine the best time for harvest. Clear trichomes indicate immature buds, milky-white trichomes signal peak THC levels, and amber trichomes suggest a more relaxing, sedative effect due to increased CBN levels. Flushing the plant with pure water in the final one to two weeks helps remove excess nutrients, enhancing the flavor and smoothness of the final product.
By the end of the flowering stage, the cannabis plant is fully developed, with thick, resinous buds ready for harvest. Proper timing ensures maximum potency, flavor, and yield, making this stage the most critical and rewarding part of the cultivation process. Once the trichomes reach the desired maturity level, it is time to proceed to the harvest stage, where drying and curing will further refine the quality of the buds.
Harvesting
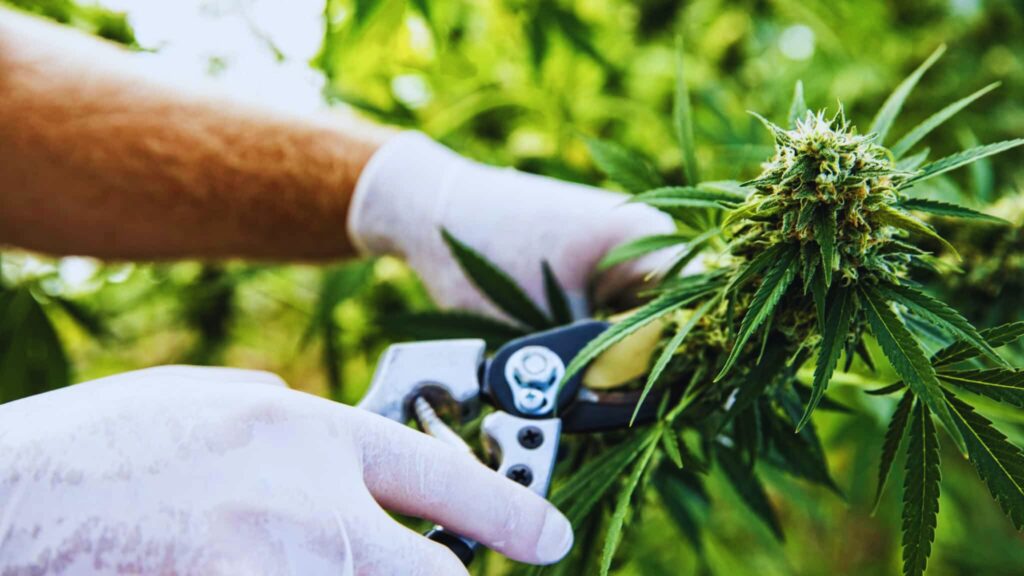
The harvesting stage is the final and most rewarding phase of cannabis cultivation, marking the moment when all the hard work pays off. Timing is crucial, as harvesting too early can result in underdeveloped buds with lower potency, while waiting too long may lead to degraded THC levels and a more sedative effect due to increased CBN. The best way to determine the right moment to harvest is by examining the trichomes on the buds using a magnifying glass or jeweler’s loupe. Trichomes that are mostly milky-white with some amber indicate peak potency, while clear trichomes signal that the plant needs more time to mature.
Before cutting the plants, many growers choose to perform a final flush in the last one to two weeks by watering with pure, pH-balanced water. This process helps remove excess nutrients from the plant, improving the smoothness and flavor of the final product. During this time, leaves may start yellowing naturally, indicating that the plant is using up its stored nutrients.
When it’s time to harvest, growers use sharp, sterilized scissors or pruning shears to cut the plant at the base or remove individual branches. The next step is trimming, which can be done in two ways: wet trimming, where leaves are removed immediately after harvest, or dry trimming, where plants are hung to dry before being trimmed. Wet trimming results in a cleaner, more aesthetically pleasing bud but requires more labor upfront, while dry trimming preserves terpenes and can make the process easier for large-scale growers.
The harvested buds must then go through the drying process, which involves hanging branches upside down or placing trimmed buds on drying racks in a dark, well-ventilated room with temperatures around 60–70°F (15–21°C) and humidity levels of 45–55%. This step typically takes 7–14 days, depending on environmental conditions. Drying too quickly can cause a harsh smoke, while excessive moisture can lead to mold growth.
Once properly dried, the buds move on to the curing process, which enhances flavor, aroma, and smoothness while preserving potency. Curing involves placing the dried buds in airtight glass jars, stored in a cool, dark place. The jars must be burped daily for the first one to two weeks to release excess moisture and prevent mold. Over two to eight weeks, the buds continue to break down chlorophyll, resulting in a smoother, more flavorful smoke.
By the end of the harvesting, drying, and curing process, the cannabis is fully prepared for use. Properly harvested and cured buds retain their potency, aroma, and terpene profile, delivering the best possible experience whether smoked, vaped, or processed into edibles and extracts.
Trimming and Drying
Trimming cannabis seeds is not a standard process in cannabis cultivation because seeds themselves do not require trimming. However, if you are referring to trimming cannabis buds, this is a crucial step after harvest to improve the appearance, potency, and overall quality of the final product. Trimming involves removing excess sugar leaves and unwanted plant material from the buds, enhancing their smoothness and making them easier to cure and consume.
There are two main trimming methods: wet trimming and dry trimming. Wet trimming is done immediately after harvest when the plant is still fresh, while dry trimming is performed after the buds have been dried. Wet trimming is often preferred by growers in humid environments, as it helps prevent mold formation and speeds up the drying process. Dry trimming, on the other hand, preserves terpenes better and is suitable for growers in drier climates, as it slows down the drying process, leading to a smoother and more flavorful final product.
To trim cannabis properly, growers use sharp scissors or trimming shears to carefully remove excess leaves around the buds. The goal is to expose as much of the resin-covered surface as possible while maintaining the natural structure of the bud. Sugar leaves contain some trichomes but are not as potent as the buds, so many growers choose to trim them off and save them for making edibles, concentrates, or hash rather than leaving them on the buds, where they can create a harsher smoking experience.
Once trimmed, the buds are ready for the curing process, where they are stored in airtight jars to enhance their flavor, aroma, and potency. Proper trimming not only improves the visual appeal of cannabis but also ensures a smoother smoke, better potency, and a cleaner final product, making it a critical step in post-harvest processing.
Curing Your Buds
Curing is an essential post-harvest process that enhances the flavor, potency, aroma, and smoothness of cannabis. Proper curing also helps preserve cannabinoids and terpenes while preventing mold. Here’s how to do it correctly:
Preparing for Curing
- Ensure your buds are properly dried before curing (stems should snap rather than bend, and buds should feel dry on the outside but slightly sticky inside).
- Use airtight glass jars (mason jars work best) to store the buds, filling them about ¾ full to allow airflow. Avoid plastic containers or bags, as they can degrade the quality over time.
Storing Your Buds
- Keep the jars in a cool, dark place with temperatures around 60–70°F (15–21°C) and humidity levels between 55–62%.
- Use humidity control packs (like Boveda or Integra Boost) if needed to maintain proper moisture levels.
Burping the Jars
- For the first one to two weeks, open the jars once or twice daily for about 5–10 minutes to release excess moisture and let in fresh air.
- After two weeks, burping can be reduced to once every few days as the moisture stabilizes.
How Long to Cure
- A minimum of two weeks is necessary for a decent cure, but four to eight weeks is ideal for the best flavor and smoothness.
- Some growers cure for several months to maximize terpene retention and overall bud quality.
Checking for Proper Curing
- Properly cured buds will feel slightly firm but not brittle.
- They should burn smoothly and produce white ash, indicating an even moisture level.
- A strong, well-developed aroma without a grassy or ammonia-like smell means the cure is successful.
By following these steps, your cannabis will retain maximum potency, smoothness, and flavor, ensuring a high-quality experience whether smoked, vaped, or used for extracts.
Conclusion
Growing cannabis seeds requires patience and attention to detail, but following these steps will help you achieve the best results. By understanding and optimizing each growth phase, you can ensure a healthy and productive cannabis garden.
Frequently Asked Questions
How long does it take to grow cannabis from seed to harvest?
It typically takes 3–6 months, depending on the strain and growing conditions.
What is the best lighting for cannabis growth?
LED grow lights are efficient, but HID and CFL lights are also effective, depending on your budget and setup.
How often should I water my cannabis plants?
Water when the top inch of soil feels dry. Overwatering can lead to root rot.
What nutrients do cannabis plants need?
During vegetation, they need more nitrogen; in flowering, they require more phosphorus and potassium.
How can I increase my cannabis yield?
Using training techniques like topping, low-stress training (LST), and the Screen of Green (ScrOG) method can maximize yield.

Pure Seed Genetics
Cannabis seeds for sale with free shipping across the USA, Europe, and Canada. Our weed seeds are bred to meet customer and breeders standards of growing of all levels and tastes.
Copyright 2026 © Pure Seed Genetics
